CLI Tool
This explains how the CLI tool was built and the concepts on which it is based. Our focus was on making the tool user-friendly.
We used
 and
and
 to develop the tool.
We chose these languages because we have already learned them, and other CLI tools are built with them as well.
These ecosystems also have a lot of support. We didn't want to figure it out on our own because that would have taken a lot of time. We wanted to use that time to develop a tool.
to develop the tool.
We chose these languages because we have already learned them, and other CLI tools are built with them as well.
These ecosystems also have a lot of support. We didn't want to figure it out on our own because that would have taken a lot of time. We wanted to use that time to develop a tool.
Dependencies
In this section, we will show you the dependencies we used to build our CLI.
Commander
We used a library called "Commander" to build the CLI tool. This library provides all the features we need. We can configure commands, use TypeScript, and much more.
Inquirer
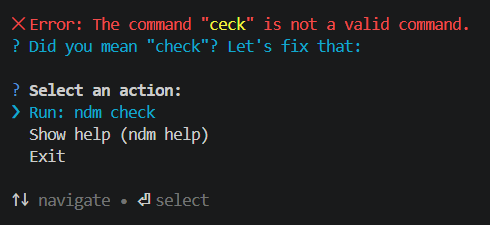
We used "Inquirer" for an interactive command-line interface (CLI). For example, we built an interact command helper for when a user misspells a command.
For instance, if you misspell "check" and write "ceck" instead:
Chalk
"Chalk" is a widely used library for working with colors in the terminal. It is easy to use. In the image above, we used Chalk to highlight the misspelled command in yellow.
It natively combines with other tools, like Inquirer, and is easy to use. You can use Chalk literally anywhere in the CLI.
Ora
"ora" is a library used for loaders and spinners. It gives the CLI a special touch and also helps improve the user experience.
Figlet
We used "Figlet" for the NDM banner in the ndm info command. It's much easier to use this library than to build it yourself.
ConfigStore
"configstore" is a library used for configuration. We use it to manage and store the configuration for the server address.
Folder structure
We use an easy-to-understand folder structure for the CLI tool. The following graph shows where the most important files are located:
.github/
src/
 ├─ commands/
 │   ├─ check.ts
 │   ├─ info.ts
 │   ├─ analyze.ts
 │   └─ ...
 ├─ utils/
 │   ├─ banner.ts
 │   ├─ config.ts
 │   └─ checks/
 │      ├─ calcHealthScore.ts
 │      ├─ calculateRiskScore.ts
 │      └─ ...
 └─ index.ts
test/
 ├─ example.test.ts
 └─ utils/
    ├─ checks.test.ts
    ├─ checks2.test.ts
    └─ ...
We saved all the commands in the commands folder. We imported them into the index.ts file for better organization.
import { Command } from "commander";
import { infoCommand } from "./commands/info";
...
async function main() {
  const program = new Command();

  program
    .name("ndm")
    .description(
      "NDM CLI Tool – Node Dependency Monitor -understand how packages work.",
    )
    .version("0.1.0");

  //Register of Commands:
  program.addCommand(infoCommand);  // It is so easy to add a command
  ...
}
main();
We saved all the larger sub-functions of the actual commands in the utils folder. For example, there is a file called askForPackageName.ts because we ask for the package name in both check and analyze.
UX
For the user experience, we used colors so that you can easily read the text and extract the important information. We also used bars to show the health and risk scores.
...
Overall Risk Score:
  ░░░░░░░░░░░░░░░░░░░░░░░░░░░░░░ 0/100  // in the ClI in red
...
Overall Health Score:
  ██████████████████████████░░░░ 85/100 // in the ClI in green
We used loaders to show users that NDM is loading. The "check" command also tells the user what NDM is currently working on while loading.